Introduction
Light switch wiring is an essential skill for any homeowner aiming to take control of their home’s electrical system. Whether you’re upgrading to smart switches, troubleshooting flickering lights, or installing a new switch, understanding the wiring process can save you time and money while ensuring your family’s safety.
This guide provides a step-by-step approach to mastering light switch wiring. From understanding the basics of electrical circuits to troubleshooting common issues, this article equips you with the knowledge and confidence to handle light switch wiring tasks. Let’s dive into this illuminating journey!
Understanding the Basics of Light Switch Wiring
What Is Light Switch Wiring?
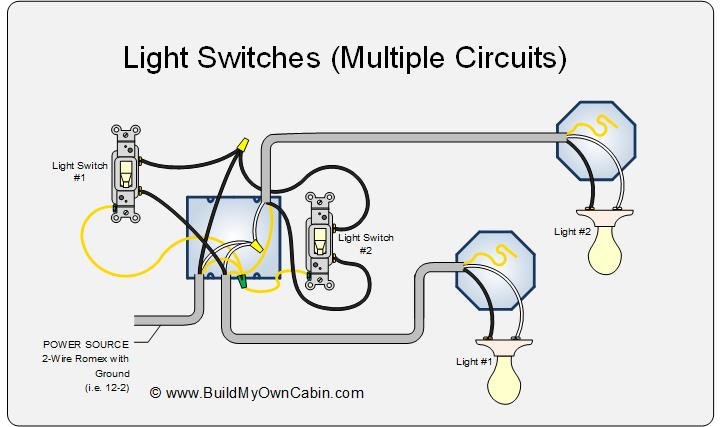
Light switch wiring connects an electrical power source to a light switch wiring fixture, allowing you to control the flow of electricity. When the switch is flipped, it either completes the circuit (turning the light on) or breaks it (turning the light off).
Electrical circuits consist of three primary components: the hot wire (carrying power to the switch), the neutral wire (returning current to the power source), and the ground wire (providing safety by directing excess current away). Understanding these components and their roles in a circuit is the foundation of successful wiring.
Proper wiring ensures functionality and safety. Incorrect wiring can lead to hazards like short circuits, electrical fires, or malfunctioning light switch wiring. That’s why it’s crucial to approach wiring projects with care and knowledge.
Tools and Materials Needed
Before starting any wiring project, gather the essential tools and materials. Here’s what you’ll need:
- Tools: Screwdrivers (flathead and Phillips), wire strippers, needle-nose pliers, voltage tester, and electrical tape.
- Materials: Light switches, electrical wires (of appropriate gauge), electrical boxes, and wire connectors.
Having the right tools and materials ensures a smooth installation process. Quality tools not only make the job easier but also enhance precision, reducing the risk of errors.
Safety Precautions
Safety should always be your top priority when working with electricity. Begin by turning off the power to the circuit you’ll be working on at the breaker box. Use a voltage tester to confirm that no electricity is flowing to the switch or fixture.
Wear insulated gloves and work in a well-lit environment to avoid accidents. Always follow local electrical codes and regulations to ensure compliance and safety. If you’re unsure about any step, don’t hesitate to consult a professional.
Types of Light Switches and Wiring Configurations
Common Types of Light Switches
Choosing the right type of light switch wiring depends on your needs and the functionality you desire. The most common types include:
- Single-Pole Switches: These are the simplest and most common switches, controlling one light fixture from one location.
- Three-Way Switches: Allow control of a single fixture from two different locations, ideal for staircases or large rooms.
- Dimmer Switches: Provide adjustable lighting levels for ambiance and energy efficiency.
- Smart Switches: Enable remote control and automation through apps or voice assistants.
Each type serves a specific purpose, so selecting the appropriate one is key to meeting your light switch wiring needs.
Wiring Configurations
Light switch wiring configurations vary based on the type of switch. Here are some common setups:
- Single-Switch Circuits: A straightforward configuration with one switch controlling one light fixture.
- Two-Way and Three-Way Switches: These require more complex wiring, involving traveler wires to connect switches.
- Four-Way Switches: Used in conjunction with three-way switches to control a fixture from three or more locations.
- Dimmer and Smart Switches: Often require additional wiring or a neutral wire for proper operation.
Understanding these configurations helps in planning and executing your wiring projects effectively.
Step-by-Step Guide to Wiring a Light Switch
Preparation
Preparation is the first step to a successful wiring project. Start by selecting the appropriate switch for your needs. Ensure you have all the necessary tools and materials ready. Turn off the power supply to the circuit you’ll be working on and use a voltage tester to confirm no live wires are present.
Organize your workspace and keep all components within easy reach. Label wires if necessary to avoid confusion during installation.
Wiring a Single-Pole Switch
Wiring a single-pole switch is a straightforward process. Follow these steps:
- Remove the Old Switch: Unscrew the cover plate and detach the switch from the electrical box. Disconnect the wires, noting their positions.
- Connect the Wires: Attach the hot wire to the brass terminal, the neutral wire to the silver terminal, and the ground wire to the green terminal.
- Secure the Switch: Mount the switch back into the electrical box and screw on the cover plate.
- Test the Installation: Turn the power back on and test the switch to ensure it functions correctly.
Installing a Three-Way Switch
A three-way switch allows control of a light switch wiring fixture from two locations. Here’s how to wire it:
- Identify the Traveler Wires: These connect the two switches. One will act as the common wire, carrying power to the light.
- Connect the Wires: Attach the traveler wires to their respective terminals on each switch. Connect the common wire to the black terminal and the ground wire to the green terminal.
- Secure and Test: Install the switches and cover plates, then test the system to ensure functionality.
Upgrading to Smart Switches
Smart switches offer advanced features like remote control and scheduling. Installation involves:
- Ensure Compatibility: Check that your smart switch is compatible with your home’s wiring and lighting system.
- Install the Switch: Follow the manufacturer’s instructions to connect the wires, often requiring a neutral wire.
- Set Up the App: Download the app and follow setup instructions to integrate the switch into your smart home system.
Troubleshooting Light Switch Wiring Issues
Common Problems and Their Causes
Common light switch issues include flickering light switch wiring, switches that don’t function, and buzzing sounds. These problems often stem from loose connections, faulty switches, or incorrect wiring.
Diagnosing and Fixing Wiring Problems
Use a multimeter to test for continuity and identify faulty connections. Re-secure loose wires and replace damaged components. Always double-check your work for accuracy and safety.
When to Call a Professional
If you encounter persistent issues or complex wiring setups, it’s best to consult a licensed electrician. They have the expertise to resolve problems safely and efficiently.
Conclusion: light switch wiring
Mastering light switch wiring empowers homeowners to tackle various electrical projects confidently. By understanding the basics, choosing the right tools, and following proper installation techniques, you can ensure safe and efficient wiring.
Remember, safety should always come first. When in doubt, seek professional help to avoid risks. With the knowledge gained from this guide, you’re well-equipped to illuminate your home with confidence.